The crochet sledding gnome can keep you company all winter long. Place him on a shelf with a little fake snow and he is ready to go. He works up quickly with this free crochet pattern.
Below you will find the complete pattern and instructional photos for this crochet sledding gnome pattern. You will also find all the materials, stitches, gauge, instructional photos, and sizing information.
Crocheting in a Winter Wonderland
I just love the winter season. I remember spending a few winter breaks with my Aunt and cousins in Montana skiing and sledding. I have made so many holiday gnomes that I thought I would start making some seasonal ones and this crochet sledding gnome was a great start. Let me know in the comments what seasonal gnomes you would like to see!

Skiing and Sledding Gnomes
If you love this gnome, make sure to check out his friend the skiing gnome! Together they make quite a pair.

How to Customize you Sledding Gnome
This is your gnome so make him unique. Change the colors of his outfit to any color you like. You can change his skin tone too and change the color of his beard. There are also instructions below to make braids for a girl gnome.
I like to use the Red Heart Super Saver colors Aran for fair skin, buff for medium skin tones, cafe latte for dark skin tones, and coffee for very dark skin tones.

Don’t Miss a Single Pattern
If you love to crochet and you don’t want to miss a single free crochet pattern, make sure to sign up for the newsletter! I will send you a quick email a couple of times a week to let you know what is new. Plus you get access to a variety of crochet related printables.

The Premium Ad-Free PDF Pattern
Below you will find the free pattern with all the instructional photos and videos needed to complete the pattern, but I am also aware that several of us like to crochet on the couch, in the car, or in bed with a print out of the pattern. This is why I also offer a nicely formatted, large font PDF version of the pattern that can be purchased on Etsy or Ravelry. You can print the pattern and take it on the go with you or tuck it into your project bag or basket.
More Patterns you may Love
Don’t forget to check out all the free patterns at Winding Road Crochet. You may just find a new favorite project. Here are some great patterns you will love.

Crochet Sledding Gnome
Pin pattern to Pinterest!
Save to Ravelry Favorites!
Purchase Premium PDF Pattern on Etsy!
Materials Needed
This post may contain affiliate links. For more information refer to my Terms and Conditions.
1.4 oz or 85 yds of Red Heart With Love, Celtic Blue
0.7 oz or 43 yds of Red Heart With Love, Light Grey
0.2 oz or 12 yds of Red Heart Super Saver, White
0.1 oz or 6 yds of Red Heart Super Saver Yarn, Buff
Crochet Hook, Size E, 3.5mm
Polyfil
Yarn Needle
Scissors
8 Jumbo Popsicle Sticks
Hot Glue Sticks and Applicator
Twine (optional)
Paint (optional)
Pom Pom Maker (optional)
**Shop my Favorite Tools Here**
Stitches and Abbreviations
CH – Chain
SC – Single Crochet
SC2TOG – Single Crochet 2 stitches together
BLOSC – Back Loop Only SIngle Crochet
SLST – Slip Stitch
MC – Magic Circle (Video Tutorial)
Gauge and Size
Gauge – 5SC x 6 Rows = 1 inch
Size – Final Gnome is about 7 inches tall.
Helpful Video Tutorials
I have created a video series walking you through all the basic pieces that most gnomes have. It also teaches you the basics of amigurumi. Please note that the hat video is for the traditional hat and not the beanie.
Episode 1: Gnome Body (Plus Amigurumi Basics)
Episode 2: Nose, Arms, Feet
Episode 3: Beard and Braids
Episode 4: Gnome Hat
Episode 5: Assembling your Gnome
Other Helpful Videos
Easy way to make a Magic Circle
How to Change Colors in Crochet
Special Stitches
SC2TOG – Single Crochet 2 Stitches Together – Insert your hook into the next stitch, yarn over, pull the loop through the hook (2 loops on hook), insert hook into the next stitch, yarn over, pull the loop through the hook, (3 loops on the hook) yarn over and pull the first loop through all the loops on the hook. Your decrease is complete.


Crochet Sledding Gnome
Notes:
-Written in US terms.
– Pattern is worked in continuous rounds.
– Use a stitch marker to keep track of your rows.
Crochet Sledding Gnome Body
With Blue.
Row 1: Work 6 SC in a MC. (6)
Row 2: *2SC in the next ST* repeat from *to* a total of 6 times. (12)
Row 3: *SC in the next ST, 2SC in the next ST,* repeat from *to* a total of 6 times. (18)
Row 4: *SC in the next 2 STs, 2SC in the next ST,* repeat from *to* a total of 6 times. (24)
Row 5: *SC in the next 3 STs, 2SC in the next ST,* repeat from *to* a total of 6 times. (30)
Row 6: *SC in the next 4 STs, 2SC in the next ST,* repeat from *to* a total of 6 times. (36)
Row 7: *SC in the next 5 STs, 2Sc in the next ST,* repeat from *to* a total of 6 times. (42)
Row 8: *SC in the next 6 STs, 2SC in the next ST,* repeat from *to* a total of 6 times. (48)
Row 9-20: SC in the next STs. (48)
Row 21: *SC in the next 6 STs, SC2TOG,* repeat from *to* a total of 6 times. (42)
Row 22: *SC in the next 5 STs, SC2TOG,* repeat from *to* a total of 6 times. (36)
Row 23: SLST to the next 2 STs.
Fasten off. Weave in ends.

Crochet Sledding Gnome Beanie
Note: We will be changing colors every row to create a two-tone hat. Feel free to work the hat all in one color if you find changing colors difficult.
With Grey CH 18
Row 1: SC in the 2nd CH from the hook, SC in the next 13 CH, Change Color to White, SC in next 4 CH. (17)
Row 2: CH1, turn, BLOSC in next 4 STs, Change Color to Grey, BLOSC in last 13 STs.
Row 3: CH1, turn, BLOSC in first 13 STs, Change Color to White, BLOSC in last 4 STs.
Continue repeating rows 2-3 until you have a total of 41 rows. Fasten off, leaving a 10-inch yarn end of the grey color and a 6-inch yarn end of white. Use your yarn ends to sew the first row to the last row worked together.
Then use the grey yarn to gather up the top of the gnome’s beanie. Make a pompom out of blue and white yarn and sew it to the top of the beanie.
Arms (Make 2)
With Grey
Row 1: Work 6 SC in a MC. (6)
Row 2-3: SC in the next 6 Sts. (6)
Change to Blue.
Row 4-8: SC in the next 6 Sts. (6)
Fasten off leaving a 10-inch tail to sew the arm to the body.
Feet (Make 2)
With Grey
Row 1: Work 6 Sc in a MC. (6)
Row 2: *2SC in the next ST* repeat from *to* a total of 6 times. (12)
Row 3-5: SC in the next 12 STs. (12)
Fasten off, leaving a long tail.
Lightly stuff the feet and sew them to the front of the gnome body.
Nose
With Buff or a skin tone colored yarn.
Row 1: Work 6 SC in a MC. (6)
Row 2-3: SC in the next 6 STs. (6)
Fasten off leaving a 10 inch tail to sew the nose to the body.
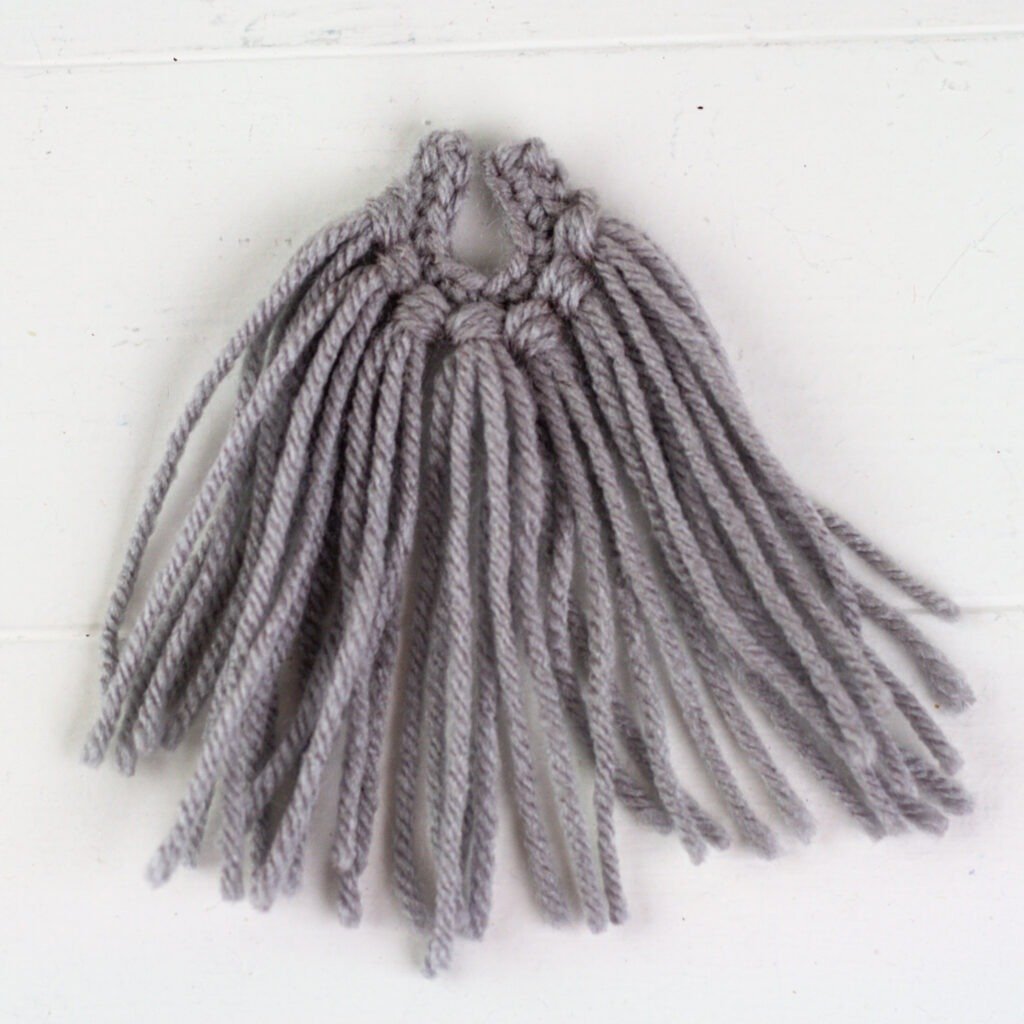
Crochet Gnome Beard (Male Gnome)
CH12 with White
Row 1: SC in the 2nd CH from hook and each CH across. Fasten off. (11)
Cut 21 eight-inch strands of yarn for the beard. Group three strands together and attach them to the 7 center single crochet like you would add fringe to a scarf. (See Photo Above)
Before stuffing your gnome, sew your beard on to you gnome in a U shape. Make sure to leave room for the nose and keep the ends close to the edge of the top of the body to be able to hide them with the hat.
If you choose, braid your beard and secure it with a small piece of yarn.
Give your beard a little trim to shape and lightly mist it with some water, style the beard and let it dry that way to hold that shape.
If you wish, you can untwist the yarn in the beard to have more hair-like strands.

Braids (Make 2) (For Female Gnome)
CH7 with Gold (or any hair color)
Row 1: Sc in the 2nd CH from hook and each CH across. Fasten off. (6)
Cut 12 10 inch strands of gold yarn for the two braids. Attach one strand of yarn to each Single Crochet like you would attach fringe to a scarf. Grab 3 groups of four strands and braid the hair together. Use a piece of yarn to secure the braids at the bottom. Sew the braids onto the body of the gnome before stuffing the gnome.

The Sled
Now that our gnome is crocheted it is time to make our sled. We will start by making the sled base by cutting 2 pieces of the jumbo popsicle stick to 2.5 inches long. Next, we will glue those two sticks to two full-size popsicle sticks as seen in the photo above.
Now we will cut the next stick to 3.5 inches to be our steering board and 4 sticks we will cut to 4 inches leaving the rounded edge on one side. Glue to the base of the sled as seen in the photo above.
Paint the sled if you would like. I painted mine red with a little bit of a white accent. I added a 9-inch piece of twine to each side of the sled to create a handle.

Crochet Sledding Gnome Assembly Instructions
You can use a yarn needle and yarn to sew each piece together in the order listed below or you can hot glue the pieces together (this is what I did) if they are not going to be played with by kids.
1. Stuff gnome body. Stuff and sew Feet to the front of the gnome.
2. Sew the beard onto the gnome. The beard will have the crocheted row shaped like a U. Style the beard and trim it. Sew the nose on top of the beard.
3. Sew the arms onto the gnome.
4. Lightly stuff the hat and sew the hat onto the body.
5. (Optional) Glue the gnome on top of the sled and glue the twine to the gnome’s hands.
6. Enjoy your gnome!
I truly hope you enjoyed the crochet sledding gnome pattern and will check back for more fun crochet gnome patterns.
Let’s Be Friends
Want to know what I am making next? Follow me on Instagram @windingroadcrochet to see sneak peeks of what I am up to and to be notified of when I release new free patterns. You can also follow me on Pinterest and Facebook. Join our Facebook group Our Crochet Journey and be a part of our community. Share, photos, ask for help and be inspired all in one place!
Written pattern, tutorials, photos, graphs, and pdfs of the Crochet Sledding Gnome free pattern are copyright Windingroadcrochet.com. Please do not reprint or repost this content as your own, but please feel free to share this link with others. You can find more information on sharing my work with others in the Terms and Conditions Page.
This little guy is so adorable thank you for sharing
Thank you so much for your lovely gnome patterns, I love them all and have enjoyed making (quite a few:) them. Your talent and commitment to sharing, are very much appreciated.
Have a wonderful Christmas with you family, treasure every moment.
Thank you so much. Have a happy holiday.
Thanks for sharing your Gnome patterns. I have only made one so far, but it won’t be the last one. Santa was fun to make. Merry Christmas and Happy Holidays to you a d yours!
Thank you so much. There are a lot of gnomes to choose from now.