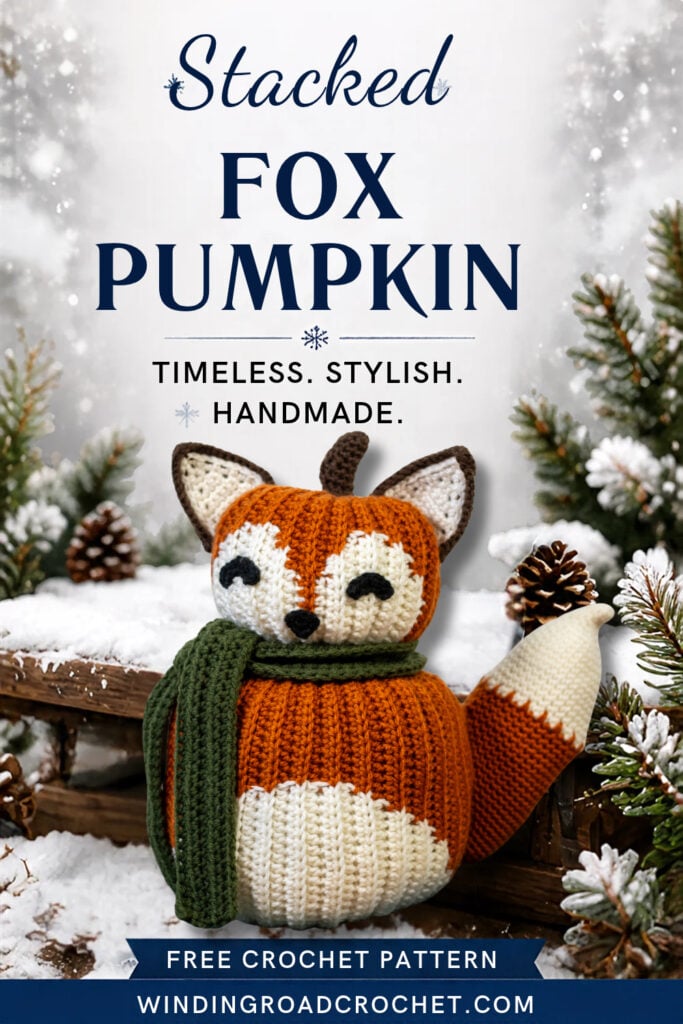
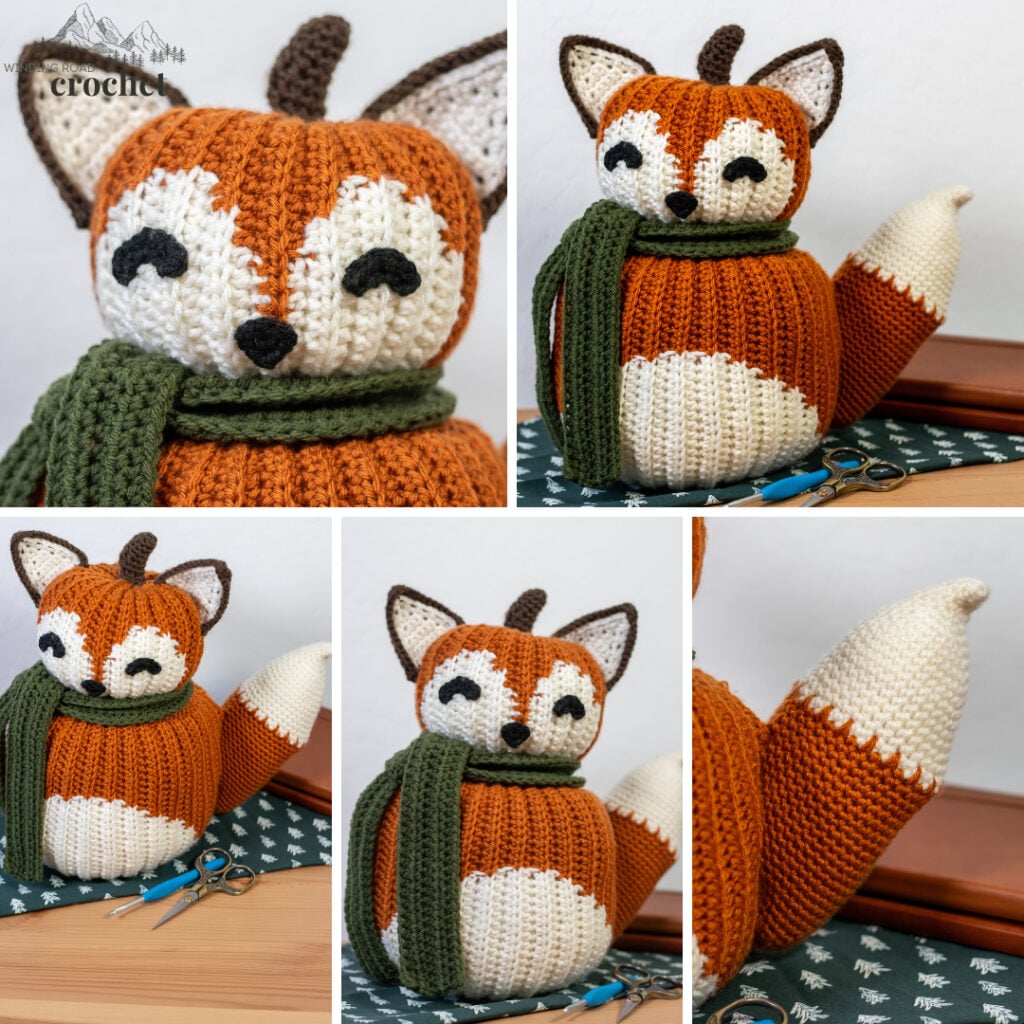
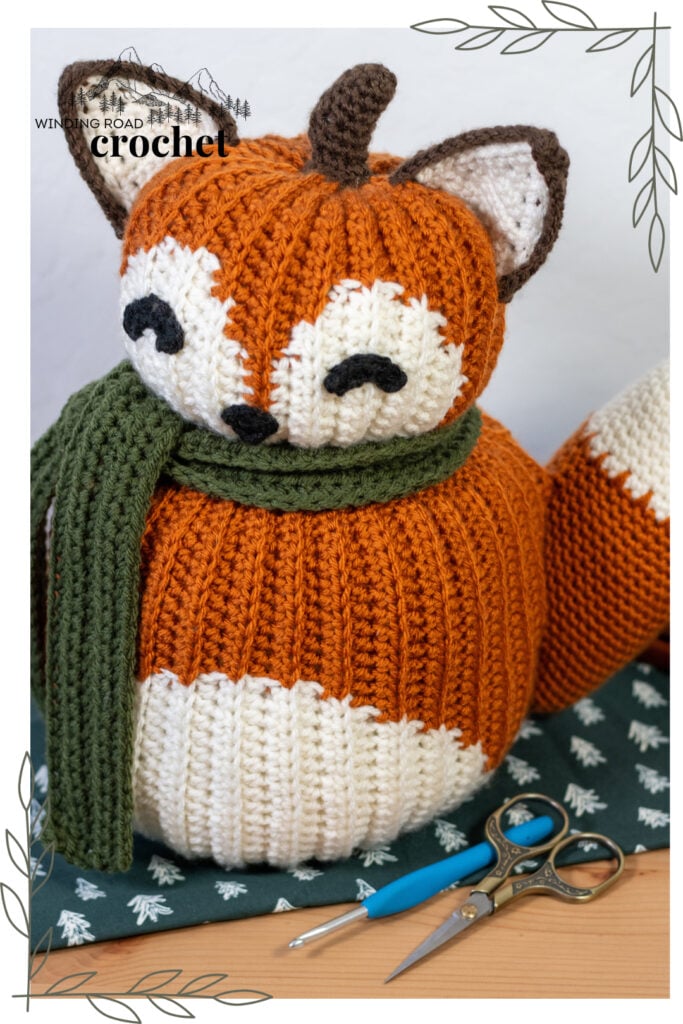
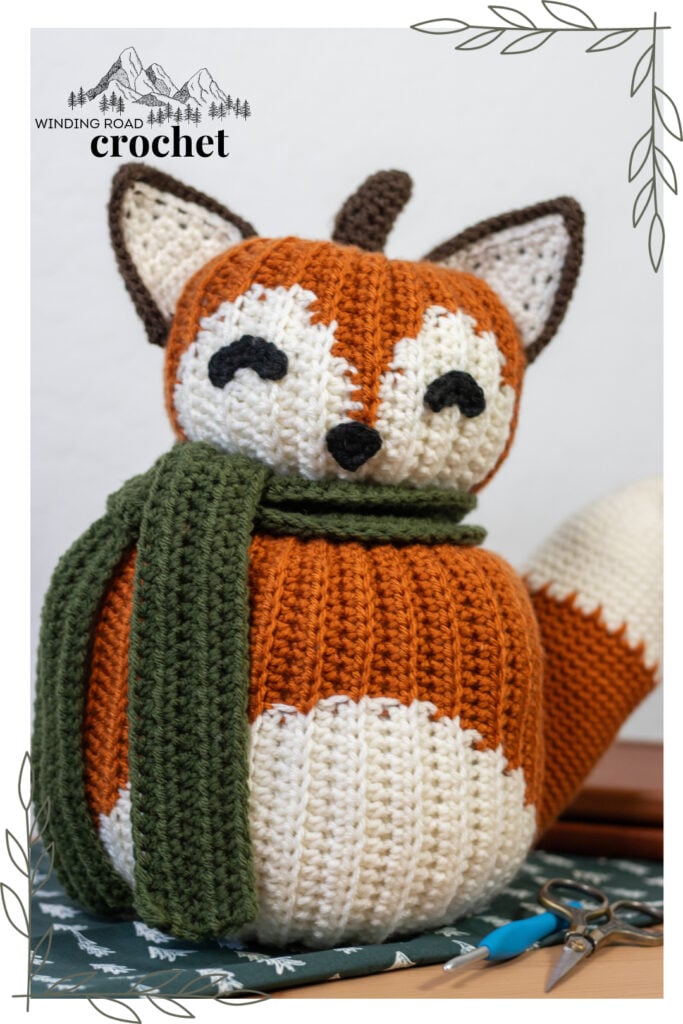
Bring a little woodland charm to your fall decorating with this adorable Stacked Crochet Fox Pumpkin! This whimsical crochet pattern combines two stacked pumpkins to create the sweetest little woodland fox. The top pumpkin becomes the fox’s head, complete with cute pointed ears, while the larger bottom pumpkin forms its body. A whimsical crochet tail attached to the side completes this fun fall design. Whether you display it on a fall mantel, add it to a cozy autumn tiered tray, or tuck it into a woodland-inspired centerpiece, this little fox pumpkin is sure to bring a touch of handmade charm to your home. Best of all, you can make your own with this free crochet pattern!
Below is the complete crochet pattern, and instructional photos for the Stacked Crochet Fox Pumpkin pattern. You will also find the material list, stitch list, gauge, and instructional photos.
This post may contain affiliate links. For more information, refer to my Terms and Conditions.
Create a stunning fall themed home with even more crochet fall fun. Check out these lovely autumn themed patterns.


Want to print the pattern? You can purchase the premium PDF pattern on Etsy and Ravelry!
crochet supplies
Yarn
I Love this Yarn Acrylic (Weight: 4/medium – 355 yds / 325 m, 7 oz/ 198 g)
Yarn Quantity
Orange (Burnt Pumpkin) – 5.5 oz/ 156 g or 279 yds/ 255 m
White (Ivory) – 3 oz/ 85 g or 152 yds/ 139 m
Black – 6 yds/ 5.5 m
Brown – 0.5 oz/ 15 g or 26 yds/ 24 m
Green (Dark Olive) – 1.2 oz/ 34 g or 61 yds/ 56 m
Yarn Substitutions
Any worsted weight (weight # 4) yarn will work for this project. Other brands include (but are not limited to) I Love This Yarn from Hobby Lobby, Red Heart Super Saver by Yarnspirations, and Bernat Value.
Hook
Size H (5mm) Crochet Hook (or the hook size needed to meet the gauge).
Notions
- Yarn Needle
- Scissors
- Stuffing

Skill Level – Intermediate
For this project, you will need to know how to work in joined rounds. There are instructions for using a magic circle or a chain to start the project. The project includes working increases to create a circle and working a repeated stitch pattern. You will also change colors and work in the back loops only. You will also need to know how to single crochet two stitches together.
Stitches + Abbreviations
CH – Chain
MC – Magic Circle
SC – Single Crochet
SC2TOG – Single Crochet 2 Stitches together
HDC – Half Double Crochet
SLST – Slip Stitch
ST(s) – Stitch(es)
Gauge
13 HDC x 7 rows = 3 inches
Size
Fox Head – 18.5 inches circumference, 7 inches wide x 5 inches tall
Fox Body – 25-inch circumference, 9 inches wide x 7 inches tall
Finished Stacked Crochet Fox Pumpkin – 13 inches tall
stacked fox pumpkin pattern notes
- The pattern is written using American crochet terms.
- The turning chain does not count as a stitch.
- The Stacked Crochet Fox Pumpkin pattern is copyrighted by Winding Road Crochet.
- The tail and stem pattern starts with a Magic Circle. An alternative method for starting the pattern without a magic circle is provided.
- The tail, stem, and nose pattern are worked in rounds.
- The Fox head, fox body, ears, and eyes are worked in rows.
- For the Fox head and Fox body, every row except row 1 is worked in the back loops only.
video tutorial
Check out the video tutorial and don’t forget to subscribe to my YouTube Channel for more fun crochet video tutorials.
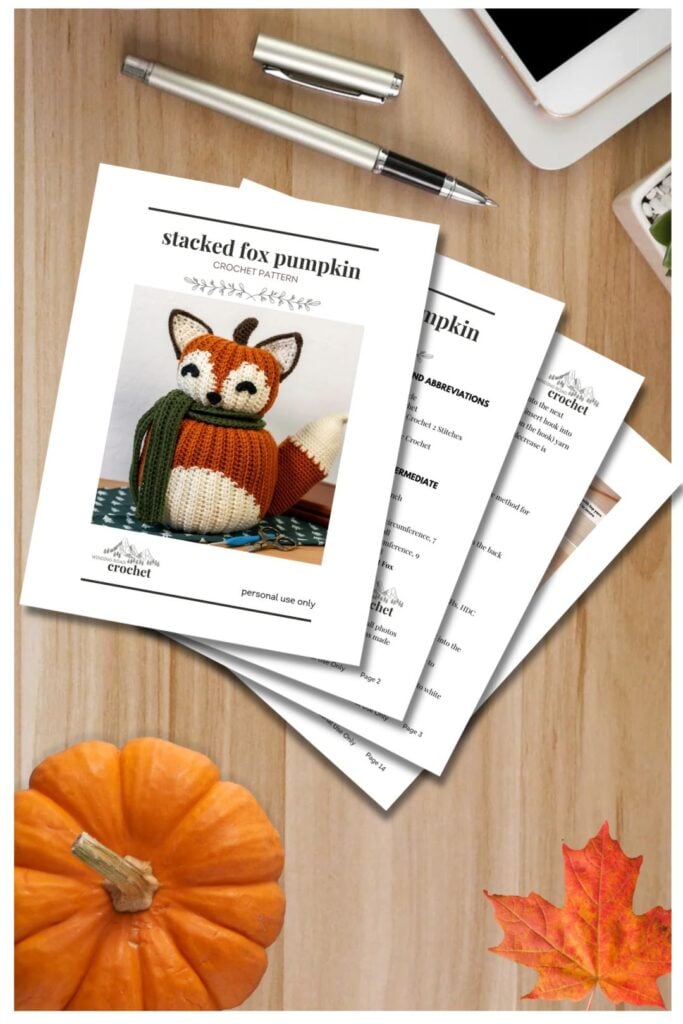
Upgrade to the Printable PDF.
Get the written pattern formatted into an easy-to-print PDF. It is perfect for on-the-go or on-the-couch crocheting.
PDF includes links to the video tutorial and instruction photos moved to the last page to help save on ink.
stacked crochet fox pumpkin pattern
Crochet Fox Pumpkin Head
With orange yarn, CH 29.
Row 1: Work a SC into the second CH from the hook. SC into the next 5 CHs, HDC into the next 16 CHs, SC into the last 6 CHs. (28)
Note: All stitches of rows 2-44 are worked in the back loops only.
Rows 2-12: CH 1, turn, SC into the first 6 STs, HDC into the next 16 STs, SC into the last 6 STs. Change yarn color to white yarn.
Row 13: CH 1, turn, SC into the first 6 STs, HDC into the next 6 STs, Change to orange yarn, HDC into the next 10 STs, SC into the last 6 STs.
Row 14: CH 1, turn, SC into the first 6 STs, HDC into the next 8 STs, Change to white yarn, HDC into the next 8 STs, SC into the last 6 STs.
Row 15: CH 1, turn, SC into the first 6 STs, HDC into the next 10 STs, Change to orange yarn, HDC into the next 6 STs, SC into the last 6 STs.
Row 16: CH 1, turn, SC into the first 6 STs, HDC into the next 5 STs, Change to white yarn, HDC into the next 11 STs, SC into the last 6 STs.
Row 17: CH 1, turn, SC into the first 6 STs, HDC into the next 12 STs, Change to orange yarn, HDC into the next 4 STs, SC into the last 6 STs.
Row 18: CH 1, turn, SC into the first 6 STs, HDC into the next 4 STs, Change to white yarn, HDC into the next 12 STs, SC into the last 6 STs.
Row 19: CH 1, turn, SC into the first 6 STs, HDC into the next 12 STs, Change to orange yarn, HDC into the next 4 STs, SC into the last 6 STs.
Row 20: CH 1, turn, SC into the first 6 STs, HDC into the next 6 STs, Change to white yarn, HDC into the next 10 STs, SC into the last 6 STs.
Row 21: CH 1, turn, SC into the first 6 STs, HDC into the next 8 STs, Change to orange yarn, HDC into the next 8 STs, SC into the last 6 STs.
Row 22: CH 1, turn, SC into the first 6 STs, HDC into the next 12 STs, Change to white yarn, HDC into the next 4 STs, SC into the last 6 STs.
Row 23: CH 1, turn, SC into the first 6 STs, HDC into the next 8 STs, Change to orange yarn, HDC into the next 8 STs, SC into the last 6 STs.
Row 24: CH 1, turn, SC into the first 6 STs, HDC into the next 6 STs, Change to white yarn, HDC into the next 10 STs, SC into the last 6 STs.
Row 25: CH 1, turn, SC into the first 6 STs, HDC into the next 12 STs, Change to orange yarn, HDC into the next 4 STs, SC into the last 6 STs.
Row 26: CH 1, turn, SC into the first 6 STs, HDC into the next 4 STs, Change to white yarn, HDC into the next 12 STs, SC into the last 6 STs.
Row 27: CH 1, turn, SC into the first 6 STs, HDC into the next 12 STs, Change to orange yarn, HDC into the next 4 STs, SC into the last 6 STs.
Row 28: CH 1, turn, SC into the first 6 STs, HDC into the next 5 STs, Change to white yarn, HDC into the next 11 STs, SC into the last 6 STs.
Row 29: CH 1, turn, SC into the first 6 STs, HDC into the next 10 STs, Change to orange yarn, HDC into the next 6 STs, SC into the last 6 STs.
Row 30: CH 1, turn, SC into the first 6 STs, HDC into the next 8 STs, Change to white yarn, HDC into the next 8 STs, SC into the last 6 STs.
Row 31: CH 1, turn, SC into the first 6 STs, HDC into the next 6 STs, Change to orange yarn, HDC into the next 10 STs, SC into the last 6 STs.
Fasten off the white yarn.
Rows 32-44: CH 1, turn, SC into the first 6 STs, HDC into the next 16 STs, SC into the last 6 STs.
Fasten off and weave in your ends.
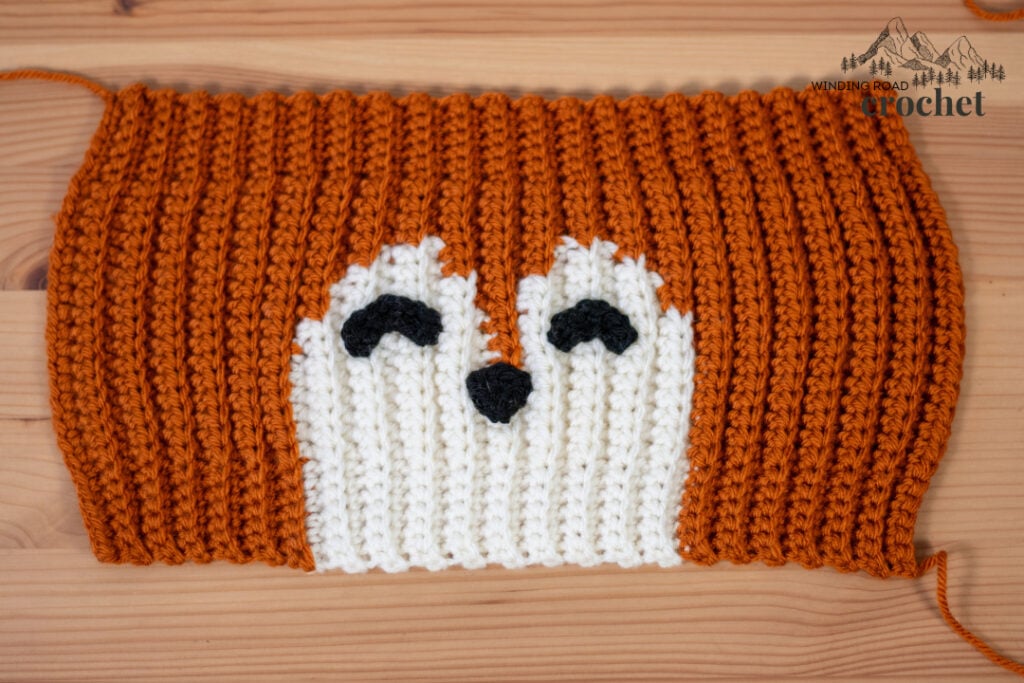
Crochet Fox Pumpkin Eyes (Make 2)
With Black yarn CH 6.
Row 1: Work 2 SC into the 2nd CH from the hook, SC in the next CH, Work 2 SC in the next CH, SC in the next CH, Work 2 SC in the last chain.
Fasten off, leaving an 8-inch yarn end to sew the eye to the fox face.
Crochet Stacked Fox Pumpkin Nose
This piece is worked in a single round.
Round 1: Into a magic circle work a HDC, CH 2, Work 2 HDC, CH2, Work 2 HDC, CH2, HDC.
Fasten off and use the yarn end to sew the first stitch to the last. Use the rest of the yarn end to sew the nose to the fox face.
Crochet Fox Pumpkin Body
With orange yarn, CH 53.
Row 1: Work a SC into the second CH from the hook. SC into the next 12 CHs, HDC into the next 26 CHs, SC into the last13 CHs. (52)
Note: All stitches of rows 2-67 are worked in the back loops only.
Rows 2-16: CH 1, turn, SC into the first 13 STs, HDC into the next 26 STs, SC into the last 13 STs. Change yarn color to white yarn.
Row 17: CH 1, turn, SC into the first 13 STs, change to orange yarn, HDC into the next 26 STs, SC into the last 13 STs.
Row 18: CH 1, turn, SC into the first 13 STs, HDC into the next 23 STs, Change to white yarn, HDC into the next 3 STs, SC into the last 13 STs.
Row 19: CH 1, turn, SC into the first 13 STs, HDC into the next 5 STs, change to orange yarn, HDC into the next 21 STs, SC into the last 13 STs.
Row 20: CH 1, turn, SC into the first 13 STs, HDC into the next 19 STs, Change to white yarn, HDC into the next 7 STs, SC into the last 13 STs.
Row 21: CH 1, turn, SC into the first 13 STs, HDC into the next 9 STs, change to orange yarn, HDC into the next 17 STs, SC into the last 13 STs.
Row 22: CH 1, turn, SC into the first 13 STs, HDC into the next 15 STs, Change to white yarn, HDC into the next 11 STs, SC into the last 13 STs.
Row 23: CH 1, turn, SC into the first 13 STs, HDC into the next 12 STs, change to orange yarn, HDC into the next 14 STs, SC into the last 13 STs.
Row 24: CH 1, turn, SC into the first 13 STs, HDC into the next 13 STs, Change to white yarn, HDC into the next 13 STs, SC into the last 13 STs.
Row 25: CH 1, turn, SC into the first 13 STs, HDC into the next 14 STs, change to orange yarn, HDC into the next 12 STs, SC into the last 13 STs.
Row 26: CH 1, turn, SC into the first 13 STs, HDC into the next 11 STs, Change to white yarn, HDC into the next 15 STs, SC into the last 13 STs.
Row 27: CH 1, turn, SC into the first 13 STs, HDC into the next 16 STs, change to orange yarn, HDC into the next 10 STs, SC into the last 13 STs.
Row 28: CH 1, turn, SC into the first 13 STs, HDC into the next 10 STs, Change to white yarn, HDC into the next 16 STs, SC into the last 13 STs.
Row 29: CH 1, turn, SC into the first 13 STs, HDC into the next 17 STs, change to orange yarn, HDC into the next 9 STs, SC into the last 13 STs.
Row 30: CH 1, turn, SC into the first 13 STs, HDC into the next 9 STs, Change to white yarn, HDC into the next 17 STs, SC into the last 13 STs.
Row 31: CH 1, turn, SC into the first 13 STs, HDC into the next 17 STs, change to orange yarn, HDC into the next 9 STs, SC into the last 13 STs.
Row 32: CH 1, turn, SC into the first 13 STs, HDC into the next 9 STs, Change to white yarn, HDC into the next 17 STs, SC into the last 13 STs.
Row 33: CH 1, turn, SC into the first 13 STs, HDC into the next 17 STs, change to orange yarn, HDC into the next 9 STs, SC into the last 13 STs.
Row 34: CH 1, turn, SC into the first 13 STs, HDC into the next 10 STs, Change to white yarn, HDC into the next 16 STs, SC into the last 13 STs.
Row 35: CH 1, turn, SC into the first 13 STs, HDC into the next 16 STs, change to orange yarn, HDC into the next 10 STs, SC into the last 13 STs.
Row 36: CH 1, turn, SC into the first 13 STs, HDC into the next 11 STs, Change to white yarn, HDC into the next 15 STs, SC into the last 13 STs.
Row 37: CH 1, turn, SC into the first 13 STs, HDC into the next 14 STs, change to orange yarn, HDC into the next 12 STs, SC into the last 13 STs.
Row 38: CH 1, turn, SC into the first 13 STs, HDC into the next 13 STs, Change to white yarn, HDC into the next 13 STs, SC into the last 13 STs.
Row 39: CH 1, turn, SC into the first 13 STs, HDC into the next 12 STs, change to orange yarn, HDC into the next 14 STs, SC into the last 13 STs.
Row 40: CH 1, turn, SC into the first 13 STs, HDC into the next 15 STs, Change to white yarn, HDC into the next 11 STs, SC into the last 13 STs.
Row 41: CH 1, turn, SC into the first 13 STs, HDC into the next 9 STs, change to orange yarn, HDC into the next 17 STs, SC into the last 13 STs.
Row 42: CH 1, turn, SC into the first 13 STs, HDC into the next 19 STs, Change to white yarn, HDC into the next 7 STs, SC into the last 13 STs.
Row 43: CH 1, turn, SC into the first 13 STs, HDC into the next 5 STs, change to orange yarn, HDC into the next 21 STs, SC into the last 13 STs.
Row 44: CH 1, turn, SC into the first 13 STs, HDC into the next 23 STs, Change to white yarn, HDC into the next 3 STs, SC into the last 13 STs.
Row 45: CH 1, turn, SC into the first 13 STs, change to orange yarn, HDC into the next 26 STs, SC into the last 13 STs.
Fasten off the white yarn.
Row 46-67: CH 1, turn, SC into the first 13 STs, HDC into the next 26 STs, SC into the last 13 STs.
Fasten off and weave in your ends.
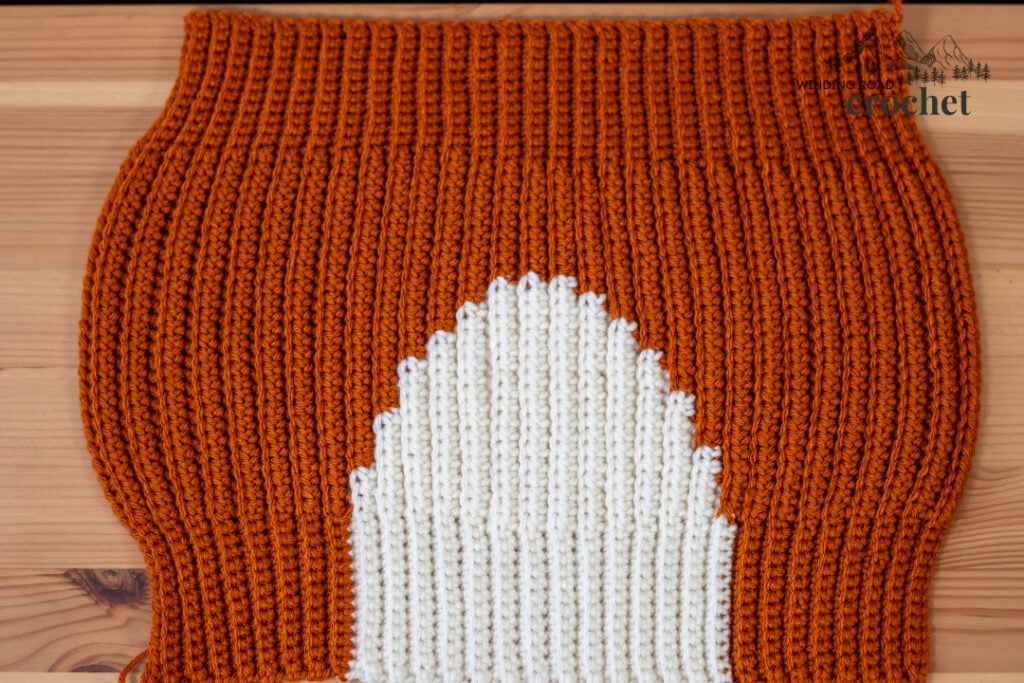
Crochet Fox Pumpkin Tail
Note: This portion of the pattern is worked in continuous rounds. If you do not like to use a magic circle, then use Alternate Round one in place of Round 1.
Start with white yarn.
Round 1: Work 6 SC into a Magic circle. (6)
Alternate Round 1: CH 2, Work 6 SC into the 2nd CH from the hook. (6)
Round 2: SC in the next 6 STs. (6)
Round 3: Work 2 SC into each of the next 3 STs, Work a HDC into the next 3 STs. (6 SC, 3 HDC)
Round 4: SC in the next ST, Work 2 SC into each of the next 3 STs, SC in the next ST, HDC in the next 4 STs. (8 SC, 4 HDC)
Round 5: HDC in the next ST, SC in the next 2 STs, Work 2 SC into each of the next 3 STs, SC in the next 2 STs, HDC in the next 4 STs. (10 SC, 5 HDC)
Round 6: HDC in the next 2 STs, SC in the next 3 STs, Work 2 SC into each of the next 3 STs, SC in the next 3 STs, HDC in the next 4 STs. (12 SC, 6 HDC)
Round 7: HDC in the next 4 STs, SC in the next 3 STs, Work 2 SC into each of the next 3 STs, SC in the next 4 STs, HDC in the next 4 STs. (13 SC, 8 HDC)
Round 8: *SC in the next 6 STs, Work 2 SC in the next ST* repeat from *to* a total of 3 times. (24 SC)
Round 9: *SC in the next 7 STs, Work 2 SC in the next ST* repeat from *to* a total of 3 times. (27 SC)
Round 10: *SC in the next 8 STs, Work 2 SC in the next ST* repeat from *to* a total of 3 times. (30 SC)
Round 11: SC in the next 30 STs.
Round 12: *SC in the next 9 STs, Work 2 SC in the next ST* repeat from *to* a total of 3 times. (33 SC)
Rounds 13-16: SC in the next 33 STs.
Round 17: *SC in the next 10 STs, Work 2 SC in the next ST* repeat from *to* a total of 3 times. (36 SC)
Rounds 18-19: SC in the next 36 STs.
Change to orange yarn.
Round 20: *SC in the next ST, Work a SC into the base of the next ST (spike stitch)* repeat from *to* a total of 18 times. (36)
Rounds 21-36: SC in the next 36 STs.
Round 37: SC in the next 4 STs, *SC2TOG, SC in the next ST* repeat from *to* a total of 3 times. SC2TOG, SC in the next 21 STs. (32)
Round 38: SC in the next 3 STs, *SC2TOG, SC in the next ST* repeat from *to* a total of 3 times. SC2TOG, SC in the next 18 STs. (28)
Round 39: SC in the next 2 STs, *SC2TOG, SC in the next ST* repeat from *to* a total of 3 times. SC2TOG, SC in the next 15 STs. (24)
Round 40: SC in the next 2 STs, *SC2TOG* repeat from *to* a total of 4 times. SC in the next 14 STs. (20)
Round 41: SC in the next 1 STs, *SC2TOG* repeat from *to* a total of 4 times. SC in the next 11 STs. (16)
Round 42: *SC2TOG, SC in the next 2 STs* repeat from *to* a total of 4 times. (12)
Round 43: *SC2TOG* repeat from *to* a total of 6 times. (6)
Fasten off leaving a 24 inch yarn end. Use the yarn end to gather up the last row of the tail. Then use the yarn end to sew the tail onto the pumpkin. Sew the tail to one side and slightly behind the fox body.
Crochet Fox Pumpkin Stem
Note: This piece is worked in continuous rounds.
Round 1: With brown yarn, Work 6 SC into a Magic Circle. (6)
Alternate Round 1: CH 2, Work 6 SC into the 2nd CH from the hook.
Round 2: Work 2 SC into the next 6 STs. (12)
Rounds 3-8: SC in the next 6 STs, HDC in the next 6 STs.
Round 9: *SC into the next 3 STs, Work 2 SC into the next ST.* Repeat from *to* a total of 3 times. (15)
Before fastening off, SLST to the next 3 STs to smooth out the edge. Now fasten off leaving a 12 in yarn end. Stuff the stem and sew it to the top of the fox head pumpkin after it has been gathered and stuffed.
Crochet Fox Pumpkin Inner Ears (Make 2)
Row 1: With white yarn, SC in the 2nd CH from the hook. (1)
Row 2: CH 1, turn. Work 2SC into the ST. (2)
Row 3: CH 1, turn. Work 2 SC into the next ST. SC in the next ST. (3)
Row 4: CH 1, turn. Work 2 SC into the next ST. SC in the next 2 STs. (4)
Row 5: CH 1, turn. Work 2 SC into the next ST. SC in the next 3 STs. (5)
Row 6: CH 1, turn. Work 2 SC into the next ST. SC in the next 4 STs. (6)
Row 7: CH 1, turn. Work 2 SC into the next ST. SC in the next 5 STs. (7)
Row 8: CH 1, turn. Work 2 SC into the next ST. SC in the next 6 STs. (8)
Row 9: CH 1, turn. Work 2 SC into the next ST. SC in the next 7 STs. (9)
Row 10: CH 1 turn your work so you can work stitches into the side of the rows. Work 1 SC into the side of each of rows 1-9, work a SC into the foundation CH, CH 1, turn your work so you are working down the other side of the rows. Work a SC into the foundation CH. Work 1 SC into the side of rows 1-9. (20SC, 1CH)
Fasten off and weave in your yarn ends. Use a brown piece of yarn to sew the inner ears to the fox ears.
Crochet Fox Pumpkin Ears (Make 2)
Row 1: With brown yarn, SC in the 2nd CH from the hook. (1)
Row 2: CH 1, turn. Work 2SC into the ST. (2)
Row 3: CH 1, turn. Work 2 SC into the next ST. SC in the next ST. (3)
Row 4: CH 1, turn. Work 2 SC into the next ST. SC in the next 2 STs. (4)
Row 5: CH 1, turn. Work 2 SC into the next ST. SC in the next 3 STs. (5)
Row 6: CH 1, turn. Work 2 SC into the next ST. SC in the next 4 STs. (6)
Row 7: CH 1, turn. Work 2 SC into the next ST. SC in the next 5 STs. (7)
Row 8: CH 1, turn. Work 2 SC into the next ST. SC in the next 6 STs. (8)
Row 9: CH 1, turn. Work 2 SC into the next ST. SC in the next 7 STs. (9)
Row 10: CH 1, turn. Work 2 SC into the next ST. SC in the next 8 STs. (10)
Row 11: CH 1, turn. Work 2 SC into the next ST. SC in the next 9 STs. (11)
Row 12: CH 1, turn. Work 2 SC into the next ST. SC in the next 10 STs. (12)
Row 13: CH 1, turn. Work 2 SC into the next ST. SC in the next 11 STs. (13)
Row 14: CH 1 turn your work so you can work stitches into the side of the rows. Work 1 SC into the side of each of rows 1-13, work a Sc into the foundation CH, CH 1, turn your work so you are working down the other side of the rows. Work a SC into the foundation CH. Work 1 SC into the side of rows 1-13. (28SC, 1CH)
Row 15: CH1, turn. SC in the next 14 STs, Work 1 SC into the CH1 space, SC into the next 14 STs.
Fasten off and leave a 18 inch yarn end to sew the inner ear to the outer ear and to sew the ear to the fox head.
Stacked Fox Pumpkin Assembly Instructions
We will start with the fox head. First, sew the eyes and nose to the fox’s face.
Step 1: Sew a gathering stitch along the bottom of the pumpkin and pull tight.
Step 2: Make 2 stitches to secure the gather.
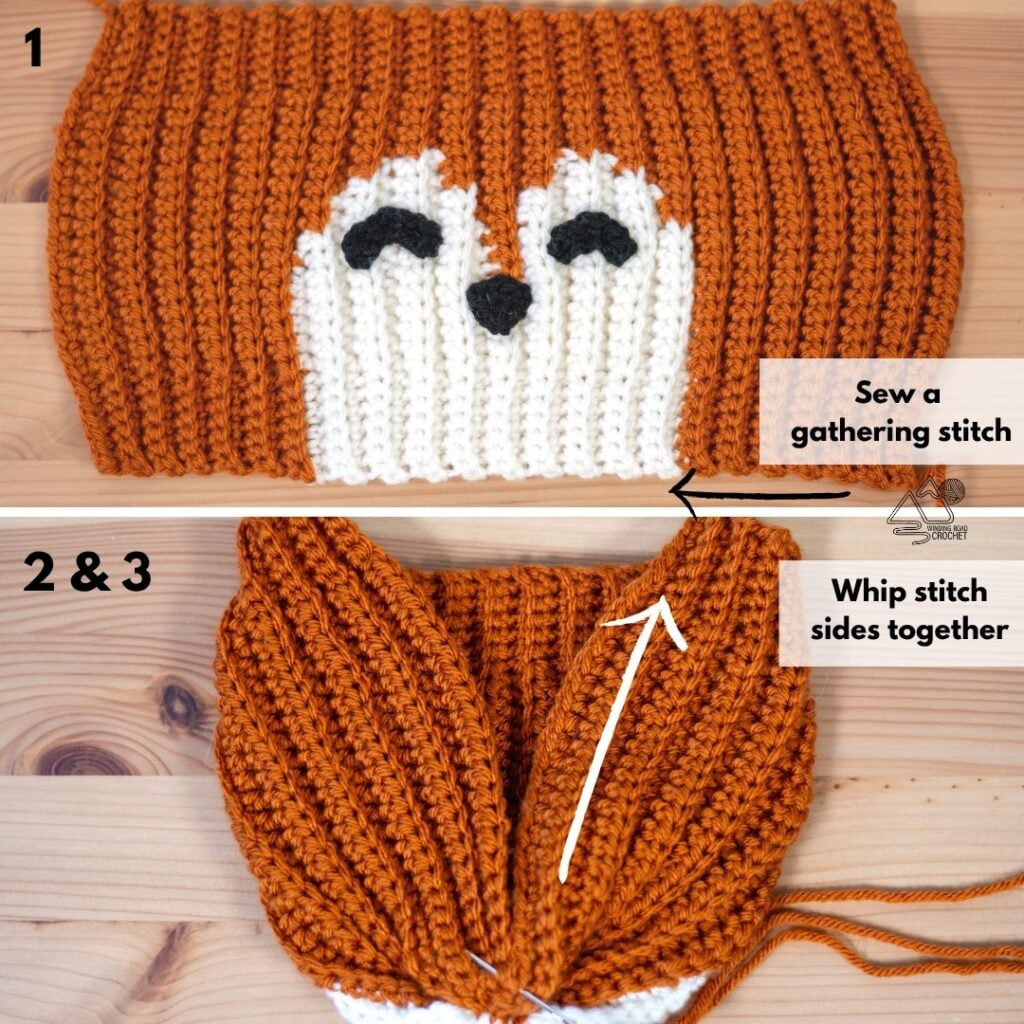
Step 3: Use a whip stitch to sew the two sides of the pumpkin together.
Step 4: When you reach the top of your pumpkin, knot your two yarn ends together to secure.
Step 5: Sew a gathering stitch around the top of the pumpkin.
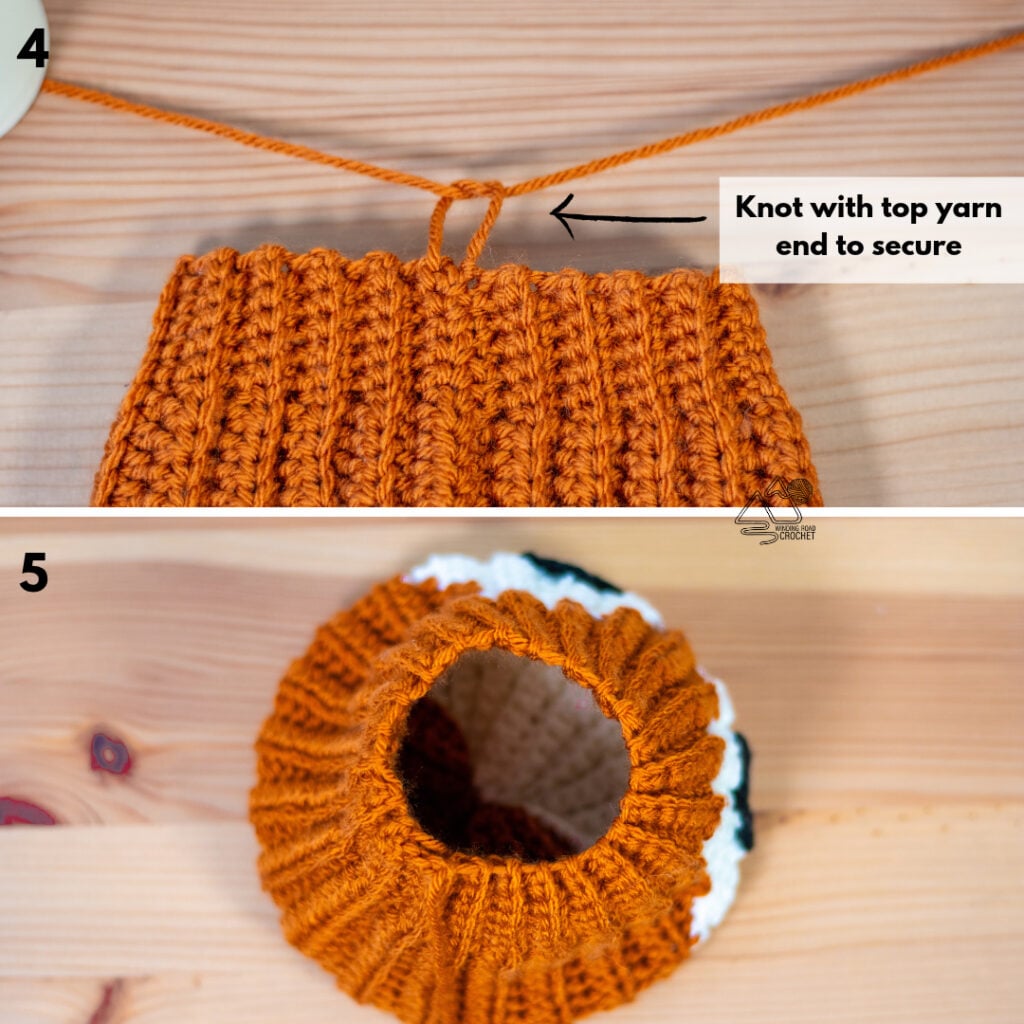
Step 6: Stuff the pumpkin. Pull the gathering stitch tight to close the top.
Step 7: Knot the two yarn ends together to secure the gather.
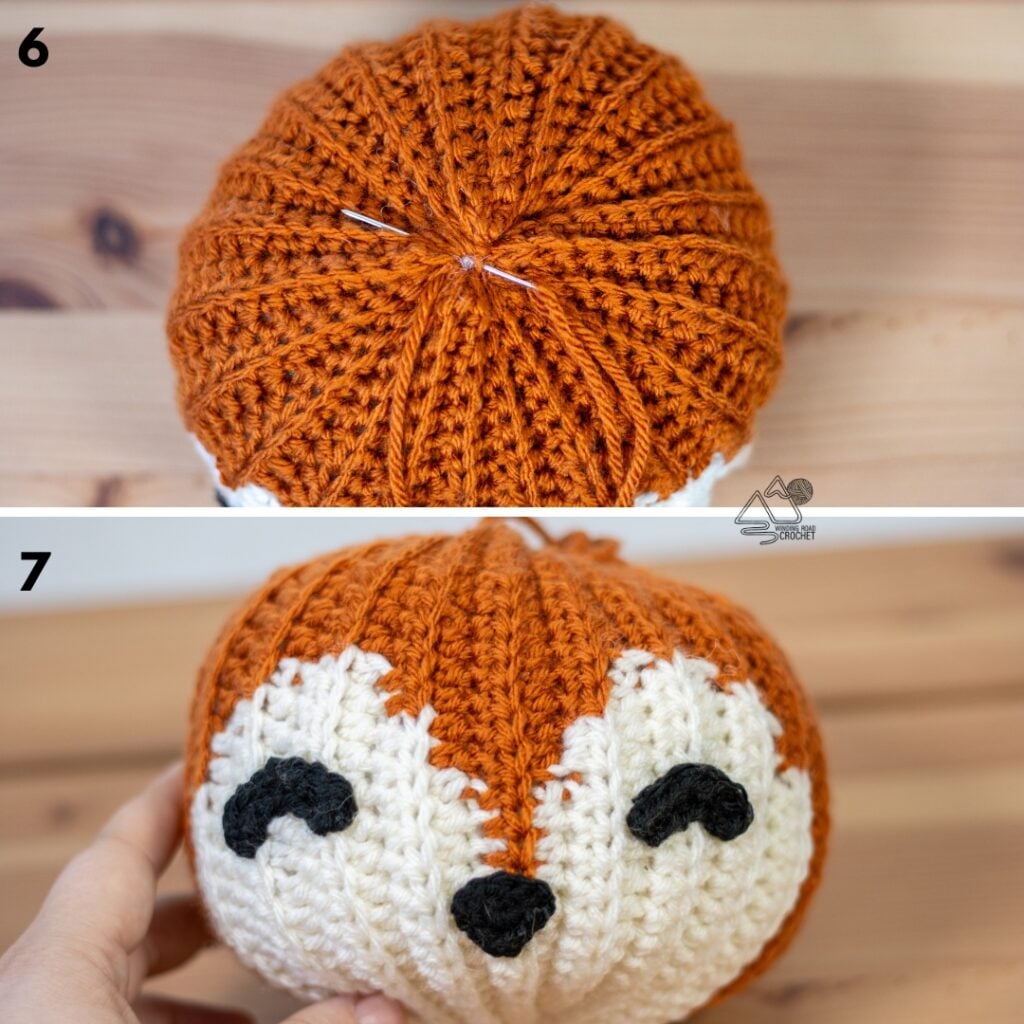
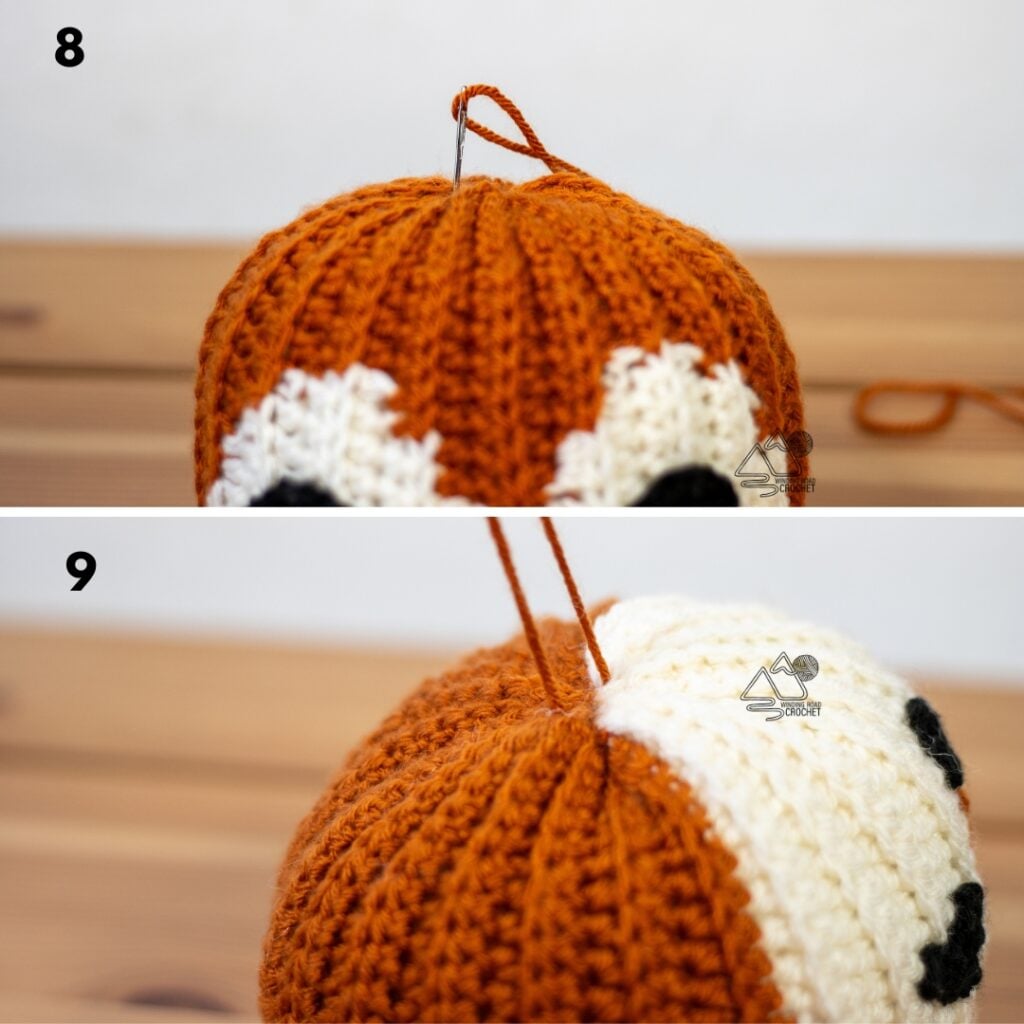
Step 8: Sew the fox ears to the top of the pumpkin.
For this pumpkin, we will simply use the yarn ends to cinch down the center of the pumpkin.
Step 9: Use a 36 inch long piece of yarn and a yarn needle. Start at the top of the pumpkin and push your yarn needle from the top to the bottom if the pumpkin. Now unthread your needle and thread it onto the other yarn end. Move two stitches over from where you inserted your needle for the first yarn end and repeat the process with the second yarn end. Both yarn ends should be at the bottom of the pumpkin.
Step 10: Pull the yarn ends tight and knot them together. Leave them long, we will need them to cinch the fox body.
Step 11: Sew the stem to the top of the fox head.
Step 12: Gather and stuff the fox body the exact same as the fox head.
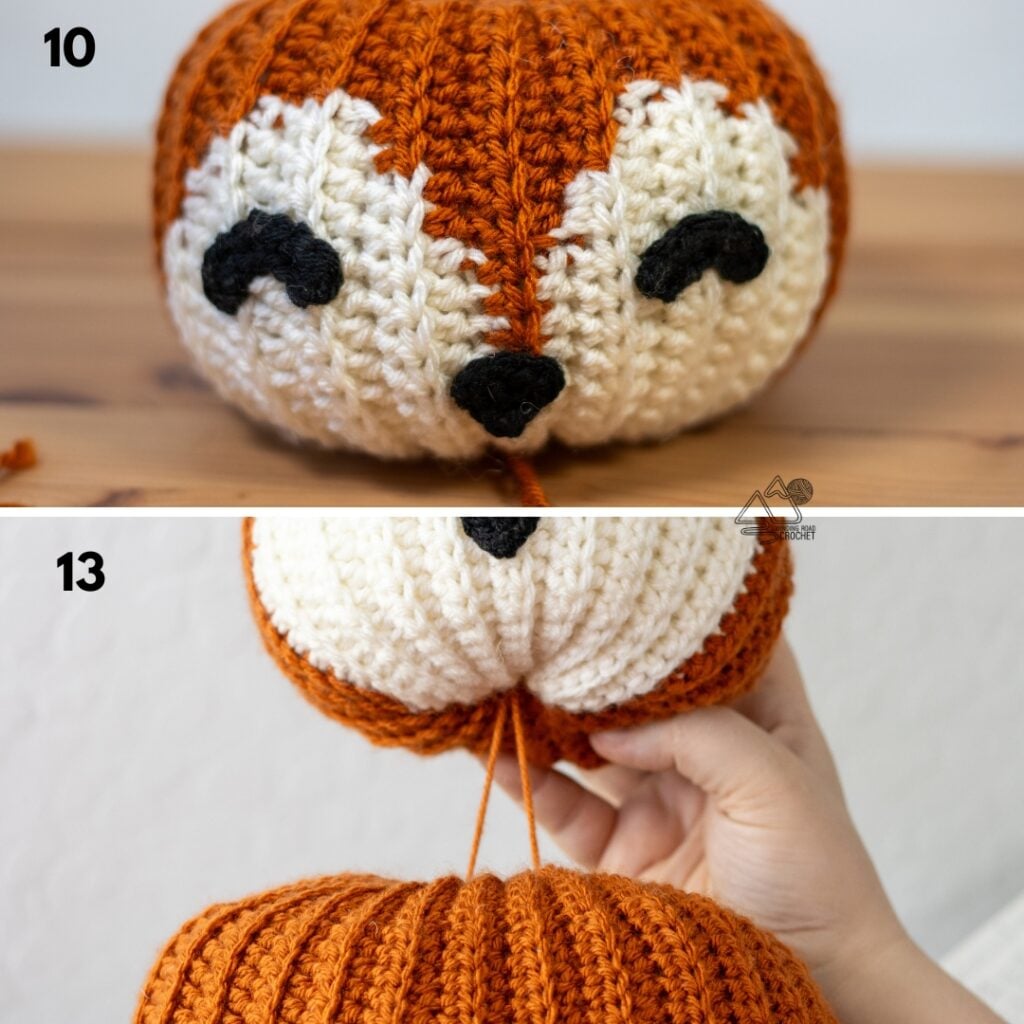
Step 13: To cinch the fox body, use the yarn ends at the bottom of the fox head. Thread one yarn end and push the needle from the top center of the fox body to the bottom center. Repeat this process with the second yarn end.
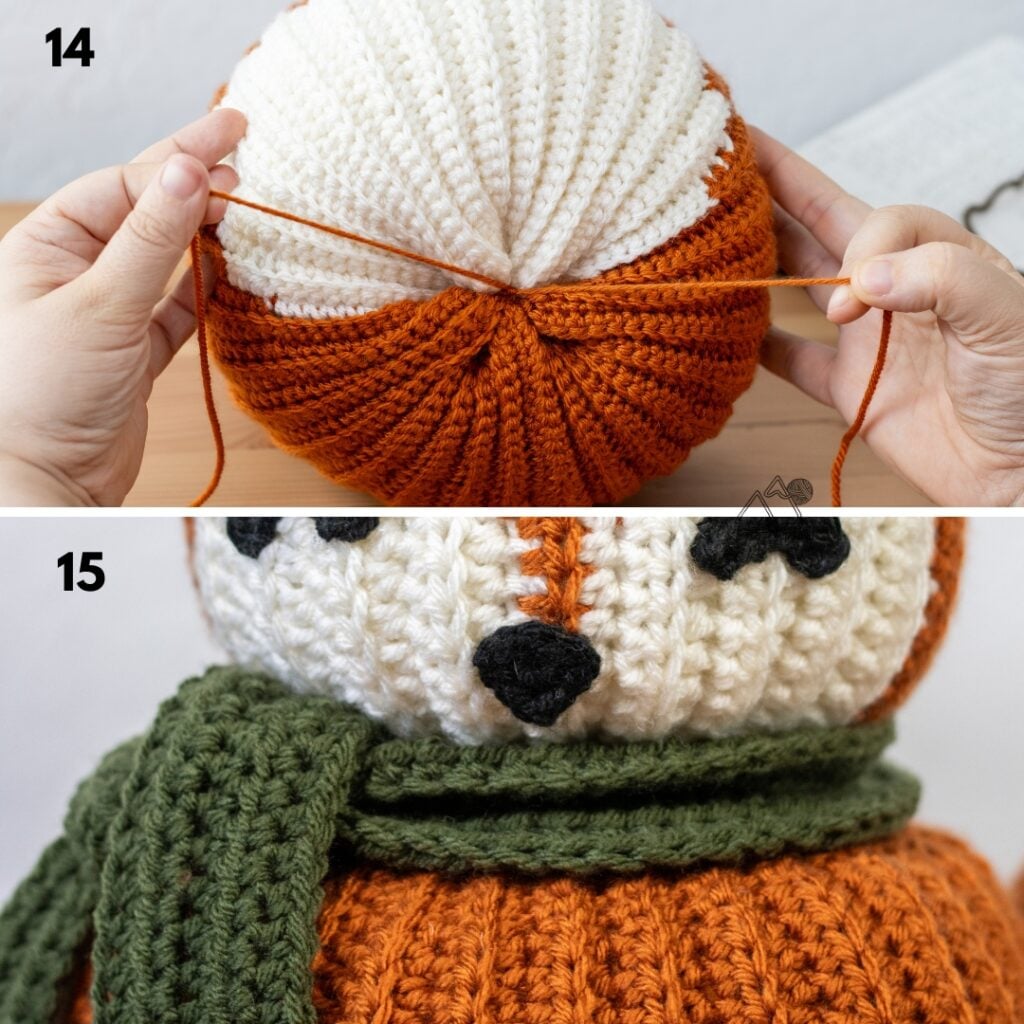
Step 14: Pull tight and knot the two yarn ends together. Hide the yarn ends in the center of the pumpkin.
Step 15: Gently wrap the scarf around the fox’s neck.
Step 16: Using the tail yarn end, sew the fox tail to the side of the fox’s body.
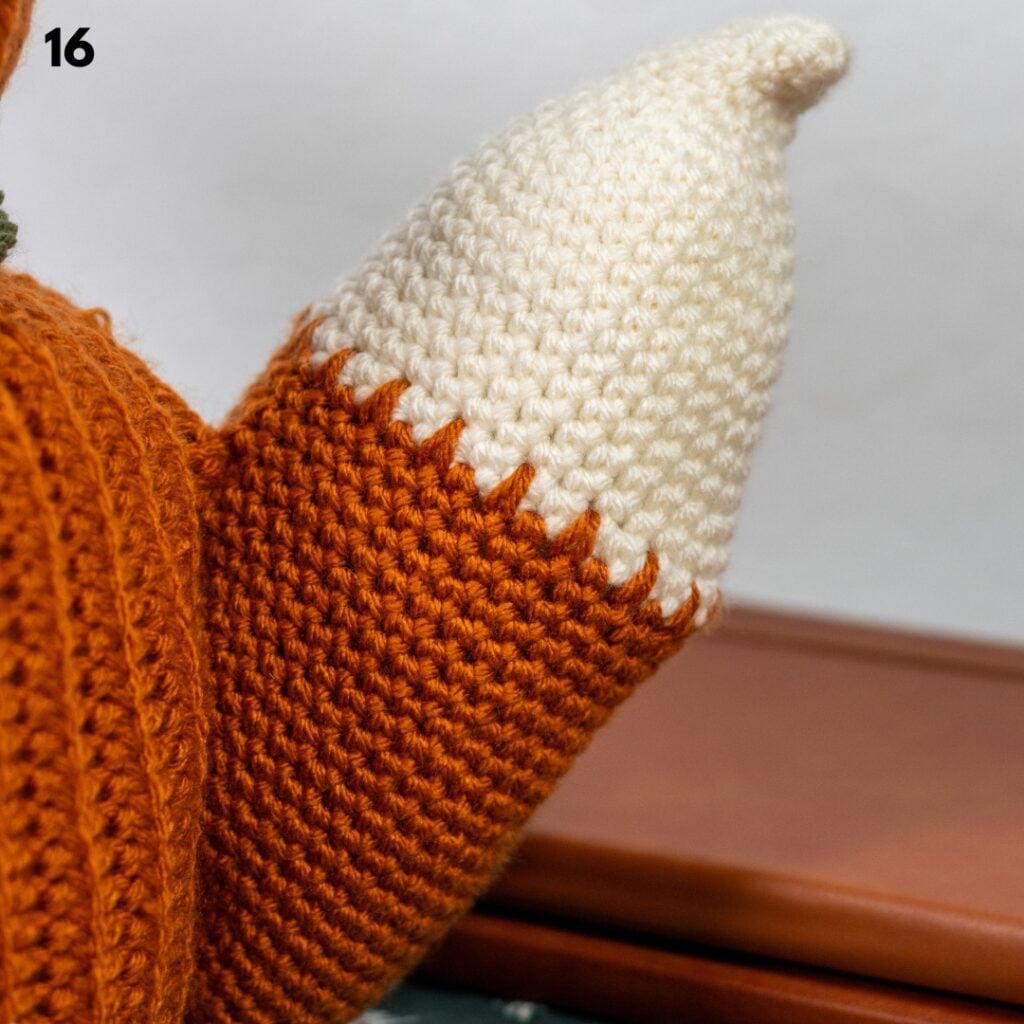
The crochet stacked fox pumpkin is done and ready to be enjoyed.
Want more to crochet? Check out these fun patterns below!


Want to know what I am making next? Follow me on Instagram @windingroadcrochet to see sneak peeks of what I am up to and to be notified of when I release new free patterns. You can also follow me on Pinterest and Facebook. Join our Facebook group Our Crochet Journey and be a part of our community. Share, photos, ask for help and be inspired all in one place!
Written pattern, tutorials, photos, graphs, and pdfs of the Stacked Fox Pumpkin crochet free pattern are copyright Windingroadcrochet.com. Please do not reprint or repost this content as your own, but please feel free to share this link with others. You can find more information on sharing my work with others on the Terms and Conditions Page.